COURT TECHNOLOGY AND TRIAL PRESENTATION

The Court Technology and Trial Presentation Blawg features articles, reviews and news of interest to lawyers and other legal professionals. This blog is published by Ted Brooks, a Trial Presentation and Legal Technology Consultant, Author and Speaker. Ted's trial experience includes the Los Angeles Dodgers divorce trial, People v. Robert Blake murder trial, and a hundreds of high profile, high value and complex civil matters.

All materials © Ted Brooks, unless otherwise indicated.

SOCIAL Twitter -- LinkedIn -- Facebook WEB www.litigationtech.com PHONE 888-907-4434

Thursday, December 18, 2014

Trial Tech Tips -- Equipment Failures

I've often said that when it comes to trial technology, it’s not a question of if it will fail, but rather when it will fail, how bad that failure will be, how long it will take to fix it, and whether anyone else will even notice that something has gone wrong.

ACTUAL CASE STUDY:
I arrived well before the trial day started in a California U.S. District Court recently, and proceeded to connect my laptop to the system in this “wired” courtroom. I connected everything just as I had been doing every morning, and proceeded to display a document – just to make sure everything was working as expected. It was not. A blank screen showed on all displays, where the document should be.
It is extremely unlikely that this would be the end of the story. Let’s take a closer look at everything stated, with possible and actual outcomes.

This article is number 3 in a series entitled “Trial Tech Tips.” Focused on the crossroads of law and technology, and in no particular order, we will share a collection of proven and tested methods for accomplishing a wide variety of common and/or critical tasks encountered during trial preparation or presentation. We will also try to rank them from one to ten on a “geek scale,” with one being not too technical, and 10 being very technical. On a geek scale of one to ten, this article would be rated at about a 5.

“…arrived well before the trial day started” – Well, at least something went right in this scenario, and it was not by accident. It was the result of planning ahead, and having the experience necessary to anticipate problems. Those who feel comfortable and confident enough to come sauntering in a couple minutes before the judge enters the courtroom are not the ones you’d want in charge of your trial presentation.

“…proceeded to connect my laptop to the system in this “wired” courtroom” – Many Federal Courts have everything needed to connect your laptop into their system and present your evidence electronically. Some State courts also have equipment. In any event, it is imperative to hook up and test the system prior to the first day of trial, and then perform a quick check daily. Bear in mind that systems and connections differ, and don’t expect them to accommodate your desire to connect an iPad wirelessly.

I connected everything just as I had been doing every morning, and proceeded to display a document – just to make sure everything was working as expected” – These is only one way to verify that everything is in working order. Test it. If it works, great. If not, and you’re in trial, and you’re in a rush (which you always are during trial), you have a real problem. Even if you’ve been in trial for several days, weeks, or even months, you should never assume that nothing has changed. From something as simple as a cord getting unplugged, to a major computer meltdown, something can and likely will go wrong at some point.

It was not. A blank screen showed on all displays, where the document should be” – Now here’s where this story could take a number of different directions. One suspect would be the courtroom equipment. Maybe someone has unplugged a cable, switched to the wrong input or output, or turned the system off.

If you have only one trial laptop, you’ll have to quickly check for problems there. If you can’t find anything wrong, you must proceed to begin troubleshooting the presentation system, attempting to isolate, locate, and correct the problem. If you’re not familiar with trial presentation equipment, it’s much too late to call someone else to help. At this point, you’re in pretty deep without a backup plan or the experience to fix the problem. It’s pretty much “game over” for you at this point.

If you do have a backup laptop ready to go with the current and updated trial database, now’s the time to connect that and see if that fixes the problem. Many things can go wrong with a computer, and although most are not really serious, one little problem can be enough to ruin your day (or career) when you’re really in a hurry. Switching to your backup quickly eliminates the other computer and its connections to the system from the equation. If that corrects the issue, you’re good to go. If not, then as in the previous scenario, you will have to look for other problems with the system.

In this particular case, one laptop had a display setting issue. Not a major problem, but one that might be expected when connecting and disconnecting several times per day to courtroom equipment during the day, and war room equipment in the evening. Since I did (and ALWAYS do) have a backup ready to go, the problem was quickly corrected, and nobody knew that anything had happened. The setting was switched and both laptops were back in action.


Expect the best, plan for the worst, and prepare to be surprised. (Dennis Waitley)

Thursday, December 4, 2014

Trial Tech Tips – Zoom and Highlighter

Two of the most important and frequently used features in trial presentation are also two of the most basic – the zoom and the highlighter. These two features can literally bring a document-intensive trial to life – quickly navigating to the desired page, then narrowing the focus to a single paragraph and emphasizing key text within that paragraph.

NOTE: This article has been featured by TechnoLawyer as the LitigationWorld Pick of the Week!

This article is number 2 in a series entitled “Trial Tech Tips.” Focused on the crossroads of law and technology, and in no particular order, we will share a collection of proven and tested methods for accomplishing a wide variety of common and/or critical tasks encountered during trial preparation or presentation. We will also try to rank them from one to ten on a “geek scale,” with one being not too technical, and 10 being very technical.

On a geek scale of one to ten, this article would be rated at about a 2. As promised in the previous article (Trial Tech Tips - TrialDirector Bates Numbering), we are aiming for the lower end of this scale in this installment.

It may seem that a trial rich with photographs, graphics, animations, videos and other interesting visuals would be the sort of trial to benefit most from using trial presentation technology. While it might indeed be difficult (if not impossible) to show some of this without a decent courtroom setup (projector, screen, monitors), the boring, document-intensive case may benefit even more.
In fact, trial presentation software was originally designed with this goal in mind – to take a plain paper document, and devise a method of showing it to the entire jury, and further, to control which part of that document the jury is able to read. The end result (trial presentation software) is an excellent example of improving upon both the efficiency and effectiveness of a process that has been around for years. In the past, a printed copy of an exhibit was shown to each juror individually, making sure everyone had an opportunity to thoroughly review it. Hopefully (but not likely), they were only reviewing what you wanted them to. Now, the process which has become commonplace in the courtroom is to show everyone at the same time. This alone can dramatically shorten the length of a trial.

While each software package (i.e., TrialDirector, Sanction, ExhibitView, Visionary, TrialPad, etc.) has its own options for zooming in on an exhibit, there are two basic methods. For purposes of this article, we will refer to them as the “area zoom” and the “callout.” The images used here were captured using TrialDirector, and are taken from an article entitled, “Trial Presentation in Large and Complex Cases.”
Area Zoom
The area zoom approximates what can be done with an ELMO, or using the pinch-zoom feature of an iPad or other tablet. Although it is a feature that jurors will be familiar with from their own computer use (another assumption that is not so much of a variable nowadays), the image is not precisely controlled, but rather just appears closer in a general area.
Callout Zoom
The callout is more precise, cutting out the surrounding area and bringing to focus only the desired portion of an exhibit. This callout is typically displayed on top of the source document, showing it (for authentication) but making it difficult to view (controlling focus). The callout is very effective for showing text in documents.

You can also highlight sections of an exhibit. It is generally recommend that you only highlight the key text, rather than an entire paragraph.
Doing so can look a bit odd when zoomed, and does little to draw focus to specific language. Highlighting everything can have the same effect as highlighting nothing, and can have a negative visual impact from the huge bright yellow block.

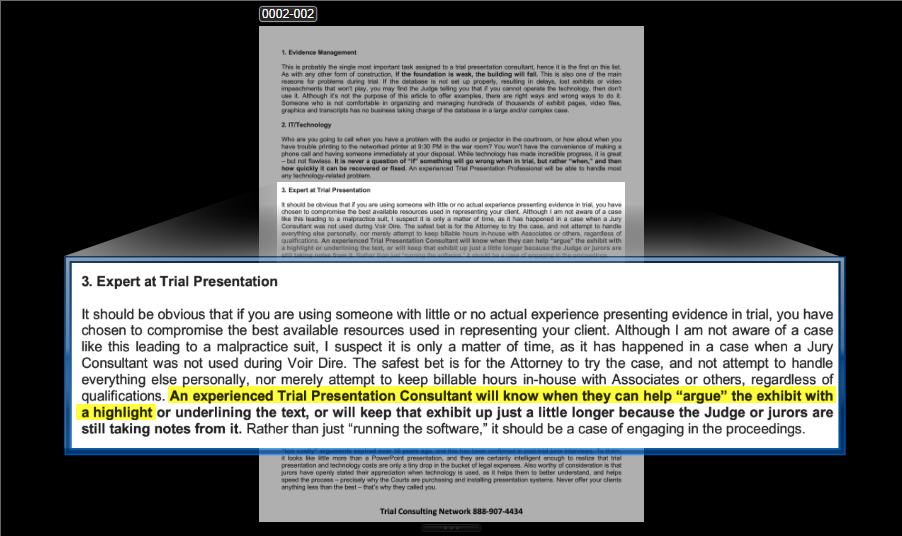
As you can see in the image below, we have now isolated the paragraph we’re concerned with, and highlighted the specific language within that paragraph. The first place your eyes are drawn to is the highlighted text. Done properly, this can have a powerful effect on what a viewer understands and remembers.
Callout Zoom with Key Text Highligted

Stepping through the images progressively illustrates a few different methods of displaying your exhibits, and the benefits of each. In the end, the more you are able to control the focus of the jurors, the more likely they will recall what you considered important enough to bring to their attention.